
Lately, I've been on the lookout for recipes that would help me develop some much-needed bread-making skills. After several failed experiments, and with no bread-maker to help me out I realized that, although there must be many different methods for creating excellent bread, they might just be too radical for me to think of without hours, days, or possibly weeks of experimenting. Sometimes an excellent cookbook or a single recipe can be your best teacher.
And so my theory was spot-on. There were several recipes that used flour and starch combinations, and in the most extreme ratios, that would have eluded me for months. I thought "so THIS is what it takes to make an excellent gluten-free bread!" This included over 3 cups of cornstarch and reversed the normal starch to rice flour ratio I was used to working with. Previously, I would have thought that this much cornstarch would turn a batter to glue.
So I'm excited to recommend this excellent recipe for Gluten-free Brioche (a French sweet bread perfect for weekend brunch) found on the stunning blog Cannelle et Vanille. I don't have a stand mixer, so I believe this is why the bread didn't rise quite as much for me, but it still had the spongy air pockets, like lava-rock, that give this bread a chewy lightness, and the rich, golden crust that was formed when the honey-crystals caramelised with the egg-wash. The explosion of taste was practically volcanic.
As it makes 3 loaves (and I haven't got around to baking the last two yet) I'll probably pre-slice and freeze at least one loaf to make a quick sweet-toast in the morning. In fact, this might be a great time to make French toast. You could try this by first toasting the slices, which dries out the bread enough so it absorbs the egg and milk mixture really well, then coat it with egg on both sides, and fry in some butter and oil. Add any spice that you like to the top or to the egg batter. My favourites have to be cinnamon and nutmeg, but experiment with anything you've got; try cloves or even cayenne for a surprise. Serve with crème fraîche or whipped, even spiced, mascarpone.
Hmm...now I think I'll help myself to some brioche...
December 14, 2009
November 24, 2009
Peanut & Ginger Chocolate Clusters

Wow. Well, I can't quite believe it, but my previous blog posting has become lost in the vast abyss somewhere...wierd! Apparently this happens to quite a few bloggers- even after you press 'save now' a billion times like I do. So sad, as I had quite a lovely piece to post. :)
Hmm...now to re-do my posting.....and how did the recipe go again....? Well, here goes!
This is a take on an old, reliable North American classic: no-bake 'top-of-the-stove' cookies. When I have limited time in the kitchen and I'm looking to have something sweet on hand for snacks or dessert throughout the week, then I often turn to a simple, no-bake cookie to yield fast and tasty results. The combination of whole peanuts with ginger is particularly 'scrummy', as they'd say in the UK, and reminiscent of South African and Asian flavour combinations where the most is made of mixing spices, nuts, and dried fruit into sweet and savoury concoctions.
Peanut & Ginger Chocolate Clusters
Makes 12 cookies
Make a sugar syrup of:
1/2 cup sugar
1/2 cup water
Add the sugar and water to a pan and, without stirring at any time, allow it to come to a simmer at medium-low heat. You'll know when the syrup is ready when it becomes quite reduced (about 10 minutes) and when you test a little on a cold plate. If it forms stretchy strings when you pick it up between your thumb and index finger then it's ready. While the syrup simmers prepare the other ingredients:
1 heaped tablespoon unsalted butter
The pulp of 1" of fresh ginger, peeled and grated, leaving any fibres behind
1/2 cup unsalted peanuts
50g 70% dark chocolate, broken into chunks
1/2 cup chopped dates
1/4 cup unsweetened shredded (dessicated) coconut
2 tablespoons milk
1/2 cup porridge oats*
Shock the caramel syrup by adding the butter followed by the ginger and peanuts. Next add the chocolate and stir until fully melted. Then stir in the dates and unsweetened coconut, and finish by adding first the milk, then the oats to act as a binder.
Using an ice cream scooper or two spoons shape the mixture into mounds and place on a baking sheet lined with parchment or wax paper. Place in the fridge to chill for 20-30 minutes until set.
As these cookies are pretty sweet I'd advise not eating them too close to bed-time..., and that's just as well because they taste great alongside a cup of milky coffee.
Enjoy daily for a snack or dessert.
*porridge oats can be replaced by gluten-free oats or by a combination of rice flakes and ground almonds
November 9, 2009
A Thank you and Chocolate Chunk Hazelnut Cookies
Thanks to Everyone at the Canadian Celiac Association for having me at the meeting on Sunday. Thank you for making the demonstration a really positive experience and I appreciated hearing all your wonderful comments and feedback after the demo. And I'm also glad you enjoyed the cookies! As promised I've posted the recipe below and a note at the bottom for an alternative approach using oats.
Hazelnut & Chocolate Chunk gluten-free cookies
Makes approximately 30-35 cookies (recipe can be halved)
Bake at 350°F for 10 minutes
Need: parchment paper for baking trays
Ingredients:
200g sweet rice flour
50g potato starch
1/2 tsp xanthan gum
3 tsp g-free baking powder (2 tsp regular baking powder)
Big pinch sea salt
250g cane sugar
260g unsalted butter at room temperature
160g (minimum 65% cocoa solids) good quality dark chocolate cut into tiny chunks
100g hazelnuts
2 large eggs
1/2 cup ground almonds
2-3 tsp vanilla
Method:
Prepare 2 large baking trays by covering them with parchment paper. First cut the chocolate into pieces and set aside. Turn the oven to about 250°F and roast the hazelnuts on a baking sheet for 8-10 minutes, then leave to cool for 5 minutes before removing skins (the cool-down time will make it easier). Once cooled then chop roughly into 1/4’s or smaller. Another easy way is to put the nuts in a zip-lock bag and bash them with a rolling pin- great stress relief but it can be a little noisy!
Cream the butter and sugar together, then add the eggs and beat with a wooden spoon, then stir in the vanilla. In a separate bowl, combine the flours, baking powder, salt, and xanthan gum then sift into wet ingredients. Mix in the ground almonds, then fold in the chopped hazelnuts and chocolate.
Spoon the cookie dough onto the prepared trays and bake for 10 minutes, just until slightly brown around the edges and still soft in the middle. Place the trays on a cooling rack and leave the cookies to rest (this will keep them chewy!) for 20 minutes before eating (the total random and unpredicted disappearance of one or two is fine of course :)).
You Could Also Try: changing the quantity of sweet rice flour to 150g and adding 50g buckwheat flour, followed by 1/2 cup oats (small oats, not rolled), and leave out the ground almonds.
October 28, 2009
Apple Ginger & Carnival Squash Soup
This is a quick and easy soup. It's so quick and easy that it disappeared into our hungry mouths before I could even think to take a photo. It's pale golden yellow in colour- very autumnal indeed.
A satisfying and light dinner great for week-nights, when you want something simple, but warm and spicy enough to keep out the autumn chill.
Serves 2
1/2 a Carnival squash (Acorn squash would also work or any other of this size)
1 large tablespoon butter plus a splash of olive oil (not extra virgin)
1 large shallot or two regular size shallots- diced
1 inch of peeled ginger root- grated using a semi-fine grater (small enough that it’s nearly pulpy in texture)
1 large sweet apple, peeled, cored, and diced
2 cups chicken stock
1 cup water
1 heaped tablespoon mascarpone or 1/4 cup heavy cream
Set oven to 400°F, and in a roasting tray filled with a 1/2 inch of water, place the squash so the inside faces down. Place in the oven and allow the squash to steam for 20-25 minutes. In the meantime, heat the butter and oil in a large pot, then add the diced shallot and grated ginger and sauté over a low heat. Add the apple pieces and a good pinch of sea salt and some freshly ground black pepper to taste and sauté for a few more minutes. Next add the chicken stock and water and bring the soup to a simmer.
For the squash, scoop out the flesh (leave the thick peel behind), and add it directly to the soup. Bring the soup to a boil for 5 minutes. Turn off the heat and gradually stir in the mascarpone or heavy cream. Pour the soup into a blender, or use a hand-blender and blend until totally smooth. Test the seasoning and adjust the salt to your taste. Garnish with another spoonful of mascarpone and some more cracked black pepper.
October 10, 2009
Deluxe Chocolate-Covered Seed, Nut and Fruit Bars

Now, I know that the sub-zero temperatures are officially telling me that it's fall and nearly winter, and that I should start to think more along the lines of heavy cakes, creamy fillings, and custard tarts, but you know, I think I may well have been converted to a healthier alternative (for now...), as long as it's smothered in dark chocolate of course! I put this recipe together earlier in the week and the chocolatey bars lasted beautifully for 4 days, which may not seem that long, but it was a good stint. In that time we enjoyed them with friends over late-night tea, brought them to a neighbour's house to have with coffee, and happily munched on them while working from home to provide some much-needed brain fuel. Now they're gone and I can't wait to make some more.
These bars are actually incredibly healthy. They contain Chia seeds (a good substitute would be hemp seeds) which are an excellent source of essential Omega oils. There's also pumpkin seeds and nuts for more protein and lovely dried fruit. You could have a lot of fun with this recipe, substituting almost any nut for the cashews - I'd recommend unsalted (or simply rinsed of their salt) pistachios or roasted hazelnuts, and if you'd like the bars to taste even richer, then try pecans. I used dried apricots and home-dried Italian prune plums (also known as Agen prunes/plums in France and the UK) but there's no reason you couldn't use a mix of any dried fruit you have on hand- either way it's worth experimenting.
Deluxe Chocolate-Covered Seed/Nut/Fruit bars:
With some butter grease the bottom and sides of a jelly-roll pan (about 16"x12"). Then line the pan with parchment paper. (The butter makes the parchment paper stay in place.) (if you don't mind a little sticking then you can skip the parchment paper)
For the Seed, Nut and Fruit Bars:
200g 70% dark chocolate (or omit the chocolate topping if you're in a rush, and just add 50g chocolate chips or baking chocolate chips in with the pumpkin seeds at the end- it won't be quite as luxurious but at least you still get the chocolate)
1 cup dried apricots
1/2 cup white rice flour
1/2 cup dried prune plums or raisins (fully dried but you could also use prunes- just be careful to add them towards the end of chopping so they don't get too mushy, or chop by hand)
1/2 cup roasted, unsalted cashews
1/3cup pumpkin seeds
2 cups porridge oats
1/4 cup chia seeds (optional) (also could use hemp seeds for a nuttier flavour)
2 eggs plus 1 egg white
1/3 cup maple syrup or honey
1/4 cup cane sugar
In a food processor chop the apricots, rice flour and dried plums until in roughly 1cm pieces. Add to large bowl, then chop the cashews- either in the processor or by smashing them with the side of a chef's knife into slightly smaller pieces. Add to bowl.
Preheat the oven to 350°F/180°C.
Add the oats, pumpkin and chia seeds if using (if using chocolate chips add them now). Stir until well combined.
Whisk together the eggs and egg white with the syrup then pour over the main ingredients. Sprinkle the sugar over the top and mix very well until the egg mixture has thoroughly coated the ingredients.
Pour the mixture into the buttered pan and spread out more or less evenly. Get a piece of plastic wrap/cling film large enough to cover the tray and press down onto the mixture. Using your rolling pin, roll over the top like a steam roller, and down the sides until there are no gaps and the mixture is well-compacted.
Bake for 12-13 minutes then remove from the oven and place the pan on a cooling rack.
For the Chocolate Topping:
Turn down the heat to 200°F and in a heat-proof bowl break the dark chocolate into same-size pieces and place in the oven until melted- this doesn't take long if using a stainless steel bowl. Using a spatula give the chocolate a good stir, then pour on top of the 'granola', and spread evenly. Allow the bars to cool completely, then cut into many enjoyable slices.
Tip: When cutting slices, if you dip your knife into a tall glass full of hot water, and then wipe it with a paper towel, this will minimize cracking in the chocolate and you'll get nicely shaped bars.
October 1, 2009
Yakama Plum and Armagnac Ice cream
It's been a few years since I first tasted plum and Armagnac ice cream and I haven't tasted it again until now. The heady combination can be a popular offering in trendy food shops in England, although inspired from traditional French recipes that combine Armagnac (brandy) with custard.
Generally prune plums are used in this ice cream coming from the famous Agen region in France. Oddly enough, in Canada the same plum variety exists, however it goes by the name 'Italian prune plum', and hardly costs anything compared with the extreme price tag of the semi-dried Agen prunes in English supermarkets. Now just to cause a little confusion I'm going to admit the truth and say that I guess my patience was limited...so I didn't wait the two extra weeks for the Italian prune plum season to start, and instead made the ice cream using an earlier plum variety called Yakama (where's the logic?).....a very sweet, easy to eat and egg-shaped plum originating in the Yakima valley in Washington.
When I returned to Canada I was incredibly excited at the prospect of making plum and Armagnac ice cream, and using local plums none-the-less. There was just one problem. I couldn't find the Armagnac.
Why Armagnac you ask? Why not use just any brandy? Well, it's really down to taste and admittedly a touch of exotica. It's similar to Cognac in that it is also distilled from wine, although it requires the use of different stills (I couldn't tell you much about that though), but I find the taste to be smoother, and a bit more complex and intriguing than Cognac.
As you probably guessed, Armagnac is to the Armagnac region in South-west France as Champagne is to the region of Champagne. The first time I tried to buy Armagnac in Paris I'm quite sure I did a great job (unintentionally of course) of totally insulting the wine merchant by asking for his cheapest (cooking quality) Armagnac. Alas, I was young...and a poor student, so every penny counted! Not only did I not know that the Armagnac region is one of the oldest regions in France for producing brandy (even older than Cognac), I also did not realise that it's mostly made by smaller producers, as opposed to the 'big names' coming out of Cognac, so naturally the status of the product is just as high as the price due to it's small-scale production and intensive techniques.
On our trip back to Europe this Spring I was determined to buy Armagnac. Luckily, on the way back from Spain we took the night train to Paris and decided to stay part of the day there on the way back to London. In a few fleeting hours we managed to do quite a lot, including finding both Pierre Hermé's pastry shop (love at first sight...) and an appropriate bottle of Armagnac, purchased with a 'knowing' look (hmm...sure), and with virtually no speech at all (okay, so my French isn't horrible, but given my last experience trying to buy Armagnac I stayed well away from using the phrase "less expensive" for fear of great insult).
So anyway, this ice cream turned out to be extremely yummy, and thank goodness, because 3 years is just too long a wait between sessions of ice cream enjoyment. It's a wonderfully creamy combination, mainly down to the new technique I've uncovered...hee hee...which I'll share below, and best enjoyed on its own so to appreciate the subtle flavours of the soft, sweet plum combined with a hint of brandy. You could add more brandy but you'd run the risk of the ice cream not freezing properly because of the higher alcohol content. If using Agen plums or 'Italian prune plums' then you may want to increase the sugar slightly as they're generally more tart than Yakamas.
Serves at least 10
For the fruit purée:
10 small-medium plums (a variety that is easily halved/not too fibrous)
2 tbsps water
just under 1/3 cup Armagnac/brandy
100g icing (confectioners) sugar
Halve the plums, remove pits, and stew in a saucepan over a low heat with the water and brandy until pulpy. Add the icing (confectioners) sugar then sieve the entire mixture into another bowl or blend in a really good blender until totally smooth.
For the ice cream:
This is the best method I've found for making a beautifully smooth ice cream. You make what is essentially a mousse instead of going for a traditional custard base.
500 ml whipping cream
100g granulated white sugar
150ml water
4 large egg yolks
As if making a buttercream, start by making a sugar syrup. There's no need to stir, just add the water and sugar in a small saucepan and just bring it to a boil. Put a small plate in the fridge. The syrup will take around 10 minutes until ready . You can test if the sugar syrup's at the candy ball stage by dropping a little onto the cold plate. Pick a bit off the plate and stretch it between your index finger and thumb- if the syrup creates strings between your fingers then it's ready to go. You could use a candy thermometer but this is more fun!
Place the egg yolks in a bowl and start whisking right away (an electric mixer is best), adding the syrup in a constant trickle. Keep whisking until the mixture has attained a mousse-like consistency. Whisk in the cream then gently stir in the plum purée. Pour into the ice cream maker and let churn for 25-30 minutes. Then transfer to a container and freeze for at least another 3 hours before serving.
September 25, 2009
2 Simple Salads
Mmm....apples! Both the air and the apples are getting nice and crispy these days and I'm ecstatic because it's coming around to baking season once again, if only just. Lovely 'Indian Summer' weather has been keeping things simple in the kitchen and the new chest freezer (recommended beyond anything else for anyone who wants to attempt a bit of self-sufficiency-it's our life-saver) is gradually being filled with bags and bags of organic home-grown tomatoes, perfectly ripe and promptly preserved peppers and kale, chard and purple French beans, and lots and lots of grated zucchini- prepared and ready for use at any time should the urge hit me to bake a zucchini cake or muffins for a tea-time snack.
For the moment though, there's a lot of fresh produce to be picked or bought at the farmers' market in the midst of all the awesome autumn bounty. Next year I've set myself a challenge to sample all of the different produce available at the market, to widen my cooking field when I'm most at risk of only cooking with the relatively limited, although tasty, produce from my garden. A few goodies I bought last week were winter savoury (a gorgeous herb tasting and smelling like a combination of thyme and sage but looks more like long sticks of thyme), golden beets- the sweetest variety available and they don't stain, tomatillos for their zesty flavour and firm texture, some excellent super-fresh apples, and a bag of sweet rainbow carrots that range from yellow to orange to purple with orange in the middle!
With my pantry full of fall goodness inspiration was fast to follow. A quick tapas-like lunch and an impromptu dinner created these two easy and tasty salads:
Zesty Carrot and Apple &
Melon and Pear salad
For the Carrot and Apple salad:
2 grated carrots- the fresher and more local the sweeter they'll be
1 grated dessert apple (not tart)
juice of 1 lime
1/2 tsp of ground sea salt
1/4 cup of roasted cashews crushed with the back of a knife
a sprinkling of sesame oil
Grate the apple into a bowl and quickly add the lime juice, followed by the grated carrot. Add the salt and stir. Then add the crushed cashews and the sesame oil. Transfer to a small serving dish. Note: You may want to double this recipe if serving as the main salad. Alternatively, this size makes a great tapas-size salad.
For the Melon and Pear salad:
1" or bite-size cubes of cantelope (or orange) melon
1 slightly crunchy/green pear cut lengthwise, with core removed, and cut in bite-size chunks or long 1/4" thick pieces
2 spring onions (aka green onions or scallions), finely chopped
1 small salad turnip (a small, white turnip resembling a radish), grated
Use equal quantities of pear and melon, or slightly more melon. There's a trick I was taught that helps to remove the 'smelly breath' factor from spring onions/scallions/green onions. After chopping the spring onions place them in a bowl and sprinkle them with a very generous pinch of salt. Next, pour boiling water over them, then strain and rinse under cold water to remove the salt. Add to the cubed melon and pear, then divide between the salad bowls. Garnish the top of each salad with the white salad turnip and serve with either a Balsamic crème or Balsamic vinegar.
September 15, 2009
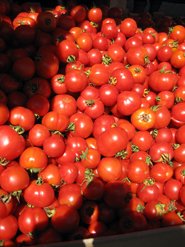
San Francisco Highlights
 |  |
 |  |
The tomatoes in the first picture were being sold at the Ferry Building Farmers' Market- one of the best markets I've ever been to. The tomatoes were some of the sweetest I've ever tasted and, for your future reference, the variety is actually called 'Early Girl' (I hope they go by the same name in Canada?). A woman dressed all funky-like (standard for San Francisco- there's great shopping everywhere including a 3-storey Williams-Sonoma- very dangerous!) was handing them out on a skewer and I gladly accepted several.
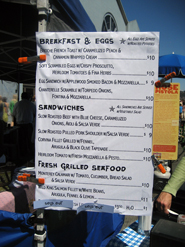
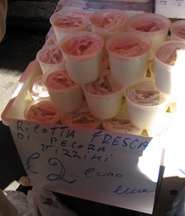
Now, I'm not kidding about how wonderful this market is. The main farmers' market is outside only on Tuesday and Saturday (and definitely worth organizing a trip around) but the incredible selection of food is also mind-boggling on the inside. Cured meats (charcuterie), gelato, wine, a patisserie, mushrooms of all sorts including 'Lobster' mushrooms- as big as you'd imagine, a cooking shop, Californian olive oil, amazing chocolates, and the list goes on and on. We actually woke up after only 4 hours of sleep the night before (our lovely friends were getting married) and drove 3 hours back up to San Francisco in order to visit the market. Luckily our determination paid off and we were not disappointed. An endless number of stalls featured such a vast selection of local, and mainly organic, produce and there were countless options for lunch- one offering (see the menu above) - the grilled salmon with shaved fennel- was absolutely gorgeous! And we could have eaten so much more... There were, however, plenty of opportunities to sample most of the produce on offer, and even the cured meats venture offered take-away slices of a mixture of meats (orange and fennel salami was one thing I tried) arranged for easy-eating from a cone. I got some stares of course when people realised I was wandering around eating slices of meat, but it was definitely worth it.
The other two photos above are of the Hot Cookie outlet/bakery in the Castro area. Risqué and proud of it! This is the district of San Francisco where gay rights were achieved through the work of the community and most notably Harvey Milk roughly 30 years ago, and I have to admit it was one of my favourite places in San Francisco. I guess because there was so much good food, good wine, organic/health stores, eco-product shops, and great coffee on offer. The community seemed very progressive in many more ways than just one, and not to mention it felt like one of the safest parts of the city in which to live. We even found a type of coffee that was labelled 'Sooo Good' (this led to some initial confusion when asking for a recommendation) it went like this: "Do you have a coffee that tastes more like chocolate than berries?" The Barrista: "Oh, that's Sooo Good" .....and you see what I mean...
Coffee aside, I wholeheartedly recommend a food-focused visit to San Francisco. There are many excellent restaurants and bakeries that have incredible reputations, and I visited a few, but there are just so many that, if you're only visiting the city for a few days, it really is worth making the food your major sightseeing destinations. And you won't have any trouble getting great dining recommendations from the locals; I've never met so many friendly people in one city before.
I have one recommendation to leave you with: the Hidden Vine. A great, low-key and casual, wine bar with a very funky/bluesy, hotel-basement, dimly-lit type of atmosphere. It offered an excellent choice of wines in a variety of flights for a really good price, or you could just share a bottle or two with friends, with the option of ordering some superb tapas. Directions: on Cosmo street, off of Taylor street, near Union Square. We tried some incredible local red wines (from the Napa Valley mainly and Santa Cruz) and sat there for over an hour talking and sipping, savouring and slurping, and never felt hurried in any way. Who could ask for more?
August 26, 2009
Pistachio Zucchini & Cardamom Cake

In creating this recipe I wanted to develop a tasty, sweet zucchini (courgette) cake that wasn't a chocolate and zucchini combination. Now don't get me wrong, I really enjoy chocolate zucchini cake, it was made by my mother on many lovely occasions; the most memorable being my 5th birthday when all my friends dove into the tasty birthday cake having no idea zucchini was the main ingredient. When I revealed the secret at school they were not very impressed (imagine lots of 'ewww' and 'ick' expressions)- but I couldn't forget just how much they had enjoyed the chocolate cake just several days before.
This time, however, called for a new take on the concept of sweet + zucchini. In the spirit of eating more locally and trying (so far unsuccessfully) to reduce the amount of dark chocolate I eat- especially in the hot summer months when there's an endless supply of fresh fruit- I thought it best to try and make a zucchini cake without using cocoa to mask the zucchini flavour....so I used cardamom and pistachio instead!
Once again, this recipe helps to use the absolute glut of zucchini gradually taking over fellow gardeners' kitchens (you can never have too many zucchini recipes at this time of year). This is one of those desserts that you may find yourself making multiple times in a month...so it can be slightly dangerous; not to mention that the temptation of calling it a 'healthy' cake can't possibly help in this regard. Luckily, the inclusion of almonds and pistachios makes this cake slightly more expensive to produce than some, so you may be less inclined to bake at the aforementioned frequency....maybe?
Saying that, the gentle refreshing spice of the cardamom, the all-encompassing aroma of pistachio nuts and the dense moistness created by the grated zucchini, makes this an ideal cake to help celebrate the end of a long day and nicely close the gap between meals, or to simply have on hand when friends and family come by for coffee or tea. I hope you enjoy it as much we have.
Pistachio Zucchini & Cardamom Cake
Preheat the oven to 180°C or 350°F and butter a metal bundt pan, or a springform pan that has a bundt-style insert.
For the flours: (yes, this nearly uses the full gamut of gluten-free flours in your pantry)
30g corn starch
50g potato starch
2 tsp baking powder
50g white rice flour
15g bean flour
15g tapioca starch
20g brown rice flour
1/2 tsp guar gum
Combine the following dried ingredients in a separate bowl and mix them together:
100g ground almonds
60g ground pistachios (unsalted or salted but washed well so the salt comes off)
75g organic cane sugar
75g icing sugar
4-5 cardamom pods*
* Open-up the pods and take out the seeds, then grind the seeds in a mortar and pestle.
Grate 400g of zucchini.
In a food processor or with a hand mixer blend:
3 eggs
150g softened (room temperature) unsalted butter
2 tsp Amaretto liqueur
Add the grated zucchini but do not mix as the zucchini will be ground enough with the next steps. Whisk 1 tbsp water with the seeds from one vanilla pod then add to the food processor. Add the almond mixture and gently incorporate. Follow this by adding the flour mixture and pulse or beat until the batter has just come together. Pour the batter into the buttered bundt pan and bake for 35-40 mins or until a skewer or knife comes out clean.
For decoration I recommend a simple lemon or Amaretto glaze followed by a sprinkling of ground pistachio nuts.
August 18, 2009
Zucchini & Fennel Cornbread
This recipe was created during an impromptu cooking session at a close friend's house in London. She was helping me to prepare some substantial party fare to feed our friends who were coming to celebrate Midsummer's Eve. That night we had an amazing time- our local park even had it's own stone circle and a near 360° view of London. To make the feasting even more complete a sweet woman at the stone circle gathering was passing around slices of leftover plum tarts from her nearby gourmet deli. What a treat; it was wonderfully generous of her and the tarts were incredible!
This gluten-free bread is admittedly pretty addictive- however it is best eaten warm or grilled with melted cheese on top- a personal favourite. I make it a couple of times each year right around the peak harvest for both fennel and zucchini- although clearly this was not the case the first time I made it- bless those English polytunnels!
Strangely enough, a friend came over today and asked for some zucchini recipe tips, and even though I had just made this bread, I completely forgot to mention it. So hopefully this recipe will find its way to her recipe book, to help tackle the fruits of her ever-abundant zucchini plant.
Required: one ring mould insert for a spring-form pan, or a similar metal ring-shaped tin.
Preheat the oven to 200°C for 45 mins and oil the pan
1 fennel bulb- thinly sliced
1 small onion- diced
2 cloves of garlic- diced
Take 325 grams of zucchini and chop in half. Grate one half and add to the above.
Sauté all of the above together with one tablespoon of olive oil and a pinch of salt on low heat, being careful not to brown the mixture, until the onion is nearly transparent. Set aside to cool.
Peel and chop the other half of the zucchini into roughly 2 cm wide x 1/4 inch thick pieces and save for adding to the main batter (these will soften up nicely when baked and will provide bursts of juiciness).
For the Gluten-free flour mixture:
1 cup cornmeal- you can mix this half and half with polenta, or you can use 100% polenta if that’s what you have on hand
1 cup oat flour (oats ground to flour consistency or store-bought oat flour)
1/2 cup rice flour
1/2 cup potato starch
2 tsp baking powder
1/4 tsp xanthan gum
1/4 tsp guar gum
For the batter:
6-8 leaves of fresh basil
2 eggs plus two egg whites
3 tbsp oil
1 cup semi-skimmed milk (2%)
1/2 cup plain yogourt
a few turns of a black pepper mill
Beat the eggs then add the oil, milk and yogourt whisking between each addition.
Roughly chop the basil and add. Add the flour mixture in two halves mixing with a wooden spoon. Then add the chopped zucchini and fold in the sautéed mixture.
Pour the batter into the oiled baking tin and bake for 45 minutes.
* If you would like a more flavourful 'crust', then sprinkle large crystals of sea salt all over the top either before baking or after 15 mins in the oven. After baking turn the bread out of the pan and let cool for a further 15 minutes- the bread is so moist that it retains a lot of heat and needs this cooling time. Enjoy warm with butter.
Optional add-ins: I recommend adding 1 cup of grated aged cheddar cheese, or another strongly flavoured cheese, like asiago, to the batter for a richer flavour.
August 12, 2009
From the Garden Salad
 Imagine...from garden to plate in 10 minutes. The tomatoes still warm from the afternoon sun, and the sweet, nectar-like juices still running from the freshly cut fennel reminding you of a glass of French Pastis.
 Who needs protein or excess carbs on a scorching hot day when you've been sitting down at the computer for hours. A light salad will certainly hit the spot, especially when packed with as much flavour as this one.
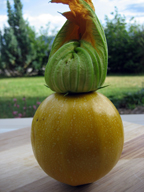
The recipe is simple. Take a mixture of tomatoes from the garden- in this case a large White Beauty and several Gardeners' Delight cherry tomatoes. If you're growing organically you don't even need to wash them.
Chop the fronds off the fennel bulb, halve and slice into 1/4 inch pieces. Take one purple or green pepper and remove the seeds from the top leaving the pepper whole, then slice into rounds, and distribute around the plate. Add all vegetables to the plate and take 4-5 medium basil leaves, tear them by hand releasing their natural oils, and scatter on top.
Make a quick dressing- I made a chipotle chile-based dressing with a bit of pre-prepared chipotle sauce mixed with some freshly squeezed lemon juice, 1/2 tsp white wine vinegar, cold-pressed extra-virgin olive oil and a small pinch of salt.
Pour over the salad and enjoy outside in the warm summer sun.
This way you'll experience summer to its fullest, both inside, and out.
August 4, 2009
Cherry Ricotta Tart (with chocolate chunks!)
 |  |
Inspired by Ben & Jerry's cherry and chocolate ice cream, and by the hundreds of plump, dark red cherries on the trees outside, with finger tips plotting together, I planned for my favourite tart so far this summer.
If you are also one who enjoys the almond-y taste of cherries then you'll be pleased to know that this wonderful taste comes from the cherry pits. For this reason I recommend including the pits in any cherry endeavour- whether it be jam, whole cherry preserves, and even guest-friendly tarts. Just be sure to tell whomever you're serving that they will indeed come across some pits!
I've used ricotta in tarts before, but the ricotta I used in the UK was smooth. Since moving back to Canada, where the store-bought ricotta is oddly closer in its grainy texture to the authentic ricotta sold in Sicily, I've wanted to make a ricotta-based tart and thought that its light sweetness would go really well in this recipe. Thinking that the tart might be a little too grainy I was anxious about the results, but it worked wonderfully. The tart filling was nicely smooth, the cherries juicy, and the chocolate soft but firm like chocolate truffles.
For the tart crust please see the previous post (Sweet Gluten-free Tart Crust)
Preheat the oven to 200°C/400°F.
For the filling:
2 egg yolks
115g or 1/2 cup caster sugar
500g ricotta cheese
80-90g of dark chocolate (70%) chopped into 1cm x 1cm chunks
2 tbsp Armagnac/brandy
Big red cherries- keep whole for more flavour, or pit if you don't want the almond-y taste. Use as many cherries as required to cover the bottom of the tart dish.
For the Cherry Glaze:
Add 1/2 cup of cherry (preserve) juice and 1/2 cup sugar and cook in a small pan on low to medium heat for at least 30 minutes until it thickens slightly, then dissolve 2 tsp of cornstarch with a very small amount of water and add to the glaze while it is still cooking; stirring the entire time until the glaze thickens.
Combine egg yolks and sugar together loosely, then fold in the ricotta cheese. Add the brandy and mix thoroughly then fold in the chocolate chunks. Distribute the cherries evenly over the tart crust, then pour the ricotta mixture evenly over the top.
Bake the tart for 15 minutes, then turn down the heat to 180°C/350°F and bake for almost 35 minutes but check the tart's progress after 30 minutes. Remove from the oven when the filling turns a light golden brown.
This tart is best served at room temperature.
Happy eating.
Sweet Gluten-Free Tart Crust
For the sweet-crust gluten-free pastry:
1 egg
75g unsalted butter at room temperature
75g icing sugar
In a food processor combine the cubed butter, icing sugar and egg. In a bowl stir the flours together with the xanthan gum and add to the butter mixture.
75g tapioca starch
50g potato starch
125g white rice flour
1/2 tsp xanthan gum
Pulse until the pastry forms a ball. Flatten the dough into a disc and wrap in plastic wrap - chill in the fridge for at least 30 minutes. This can be made ahead of time and left in the fridge until required.
Place the disc of dough between two pieces of plastic wrap and roll out. The dough may be resistant to stretching but keep rolling until you reach a thickness of roughly an 1/8th of an inch. Drape the dough over a 20-22cm loose-bottomed cake or tart tin. You may have to patch the dough a little around the sides and top edges but it will look great in the end. You can even leave the top edge looking uneven which adds to the character -making it look a little more rustic. Preheat the oven to 200°C. Fill the tart crust and bake for 15 minutes, and then turn down the heat to 180°C/350°F and bake for at least 30 minutes.
For Tarts with liquid/Custard fillings:
Prick the base with a fork and chill in the fridge for 15 minutes THEN preheat the oven to 190°C while you add the filling to the tart.
Remove the pastry from the fridge and prepare to weight the pastry for baking. Cut enough parchment paper so that it will cover the base of the pastry and so that it can be filled with baking beans (I use rice grains which is often a cheaper option than buying baking beans). Try to evenly distribute the weight so that it reaches the outer edges of the pastry base to prevent rising.
Bake the pastry for 10 minutes and remove paper and baking beans/rice. If the fork marks reveal the tin base then brush the pastry with a beaten egg to help seal it. If given the egg-wash treatment then return the pastry to the oven for a further 10 minutes.
Add the filling and return to the oven.
July 29, 2009
Garden Reflection
 |  |
Over the last 5 years I've planted a lot of seeds. The plants in my garden have sometimes grown and sometimes not. In the beginning I didn't have a clue, but over time, after starting with some easy-to-grow greens and tomato plants to build self confidence, my skills have developed to the point where finally I can say "I'm starting to understand".
Lesson Learned:
Not yet a gardening guru, but well on my way, I have learned the hardest and possibly the most important lesson this year: The Soil is Your Best Friend. Take care of it and it will take care of you in ways that you cannot fully comprehend at the start.
Often told this by my Uncle- horticultural expert extraordinaire- and all those excellent gardening books bought along the way, I still didn't quite realise that it's the one factor that will make or break your garden. Last year was my first year with actual garden space- not just pots and grow-bags- and I converted a large grassy area into garden-central. What I didn't do was add lots of dry horse manure and home-made compost into the soil in the autumn. This would have given me an excellent soil to work with this year complete with heaps of minerals and other goodies for my plants to feed on.
As a result, I now have to regularly feed my plants with nitrogen and other goodies in the form of organic fertilizers, as well as adding calcium through diluted milk and epsom salts (the milk's a great tip by the way- especially for melons- feed them with a solution of 1/2 milk and 1/2 water). But a good experience that's come out of this is learning how to make my own fertilizer with things I have on hand such as manure and coffee grounds. Not a very pleasant smell but these homemade fertilizers are rarely pretty. Despite this my boyfriend has given it the classy name of 'CaccaCino'.
Pests:
Some of my crops were absolutely demolished this year by a field mouse or two and 'the quail'- local birds (and also very tasty although I haven't got up the nerve to catch one for dinner yet) who have now figured out how to enter my garden which is surrounded by netting (it worked last year but they've adapted!). I sowed carrots 3 times and a total of 15 out of 150 came up. It was fairly obvious to tell who the culprits were by the peck marks in the soil.
Mulching:
On the up side I've learned the hard way that the Okanagan is a very dry place and plants really need to be mulched. Straw is really expensive here so if you can use that then excellent, but I use dried grass clippings- cheap, easy, and effective. This prevents the soil from drying out on the surface and keeps the moisture in the soil right where the roots need it. It will subsequently save you from having to water every day.
Watering:
Another tip- buy yourself a drip-feed watering system- it's basically like a flexible hose that you can wind through your garden, around the plants, and this will feed the water right onto the soil instead of getting it on the leaves, which can stress the plant in hot weather, and will save you A LOT of work. Just a simple turn of the tap and you can walk away, do something else, and return a half hour later to switch it off. Simple :)
This year's successes so far:
The tomatoes are doing really well. I am so relieved because one year in London all of our 9 tomato plants got Blight because it was such a wet and humid summer, so we had to burn our plants before they'd even produced fruit. Last year I was still getting a feel for cherry tomatoes- we had plenty- so this year is all about trying lots of varieties, big and small, and hopefully I planted enough to get a 'glut' as they say- enough tomatoes to make classic tomato sauce, canned and stored for the winter ahead. Not to mention all the other possibilities- homemade ketchup, canned tomatoes, you name it. Some varieties I've tried this year are Royale de Guineaux, San Marzano (plum tomatoes), White Beauty (the skin supposedly tastes like honey- more on that later), and Gardeners' Delight (a very dependable cherry tomato), along with a few more.
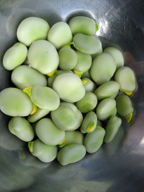
We've had one crop of regular and snap peas (you can eat the shell of these like snow peas or wait for them to develop larger peas) and a second crop is on its way. I tried Broad beans (aka Fava beans) for the first time this year and they were great- a perfect 'meaty' addition to a spring salad of young lettuce leaves, peas, and fresh mint. The purple French beans are coming along excellently with new ones appearing every day. I swear they grow inches overnight! There's a little theme going on at the moment- purple kale (now in abundance as the mice have 'disappeared'), purple beans, and purple peppers. They're really colourful which is the main attraction, but it's also great to grow something that's unique- something fun and interesting that isn't available all year round at your supermarket or produce shop. That's the fun of gardening- growing beautiful fruit and vegetables that taste far superior to store-bought produce. I'd go as far to say that home-grown carrots and melons can even taste like the gods- pure heavenly nectar.
On that note, I'd better let you get on and attend your garden, or plant that first seed you were just thinking about.
Happy Gardening!
April 27, 2009
Herby 'Griddle Cakes'
In all honesty, this recipe came about in my attempt to create a bit of interesting 'stodge' to go with our very spicy bean stew. I didn't want the usual boring potatoes or rice and bread was of course out of the question. So inspiration struck from the Venezuelan classic arepa - a grilled round 'pancake' made of a type of corn flour similar to masa harina, but specially meant for arepas. This mini corn pancake tastes amazing on its own, or classically stuffed with cheese or shredded meats almost like a taco, but many arepas are served with spicy stews to offset the multitude of flavours already competing for your taste-buds and to provide more weight to a vegetarian or meat-minimal dish.
This recipe then is a cross between Southern U.S 'griddle cakes' and South American arepas with a few European herbs thrown into the mix for a deeper flavour.
3 eggs
1 heaped tsp dried oregano leaves
1 heaped tsp dried or fresh rosemary leaves ground or chopped very finely
2 tbsps olive oil
Whisk the above together then prepare the flour mixture:
1/3 cup potato starch
2/3 cup polenta/cornmeal
1/3 cup rice flour
1/4 cup buckwheat flour
1/4 tsp xanthan gum
2 tsp baking powder (gluten free)
*3/4 cups milk (see instructions below)
Mix the flours together then add to the egg mixture and gradually whisk in by starting from the centre, incorporating the flour from around the outside. When the mixture starts to stiffen then add *1/4 cup milk, keep whisking until it starts to stiffen and then add the next 1/4 cup milk, whisk, then follow with the last 1/4 cup.
Heat the frying pan on low-medium heat. Brush some oil onto the pan. To stop the pan from smoking too much simply cook 4 griddle cakes at one time to reduce exposed surface area- this will also give you nice and small cakes. Keep them warm on a plate in the oven on the lowest heat setting until ready to serve. They are best eaten fresh and can be toasted any other time for a quick snack- try it with melted cheese on top.
Enjoy :)
April 19, 2009
Green Tea Ice Cream with Honey and Vanilla Bean
This Christmas saw the introduction of an appliance that's been 'desperately' required in my kitchen for a while- an ice cream machine! After years of attempting to make perfect ice cream with no machine, and certainly with no perfect results, I came to the conclusion that an ice cream machine is completely necessary for the ice-cream obsessed.
Without a machine you are committed to being home once every hour to stir the ice cream to achieve the desired smooth consistency. However, if you don't work from home, then finding a day that allows you to be available this often is quite a rare occurrence.
 A Cuisinart ice cream machine is the answer! It's stylish with clean lines and a smooth exterior true to the ice cream it produces. It's simply designed, and that means less moving parts, so there is less chance of breakage and the need for maintenance. This way it should last for a very long time. I've used it every few weeks since Christmas and definitely our consumption of ice cream has increased, but because I only make small batches (lots of small batches = more experimentation!) we then eat less of it at any one time- and it all works out!
Not all experimentations in 2009 have been successful, but there are a few recipes that did work and are very worth mentioning, such as rich coffee ice cream, chocolate and spice, coffee-chocolate (coming soon!), and this one:
As with most ice creams, start by making a simple custard:
- In a small pan on low to medium heat, heat 250ml whipping cream with half a cup medium-fat milk (2% or semi-skimmed).
- To the cream add the seeds and the pod of half a vanilla bean. The other half of the vanilla pod can be stored in an airtight container for another time.
- In a mixing bowl combine 100g caster sugar or Fairtrade/organic sugar with 3 egg yolks and whisk until the mixture is pale yellow in colour. To this add slightly less than 1 tbsp matcha (fine green tea powder) and stir until any lumps dissolve.
- When the cream mixture is heated through add 2 tbsps of mild honey then remove from the heat and pour through a sieve into the egg mixture quickly stirring with a wooden spoon until well incorporated.
- Return to the pan and heat on a low heat for about 10 minutes, frequently stirring until the custard has thickened. You will need to watch the custard closely. When you can draw a line through the custard on the bottom of the pan with a wooden spoon then the custard will be ready.
Once thickened remove the custard from the heat and be sure to cool it to at least blood temperature before adding it to the ice cream machine. I have noticed that either the honey or the matcha powder seems to stop the ice cream from freezing as fast as it normally does within the machine, so if after 25 minutes the ice cream is still in a 'soft-serve' state, then transfer to a container and complete the freezing in the freezer. With a bit of patience wait until the next day and you will have scrumptious, silky smooth honeyed green tea and vanilla ice cream.
Enjoy!
Without a machine you are committed to being home once every hour to stir the ice cream to achieve the desired smooth consistency. However, if you don't work from home, then finding a day that allows you to be available this often is quite a rare occurrence.
 A Cuisinart ice cream machine is the answer! It's stylish with clean lines and a smooth exterior true to the ice cream it produces. It's simply designed, and that means less moving parts, so there is less chance of breakage and the need for maintenance. This way it should last for a very long time. I've used it every few weeks since Christmas and definitely our consumption of ice cream has increased, but because I only make small batches (lots of small batches = more experimentation!) we then eat less of it at any one time- and it all works out!
Not all experimentations in 2009 have been successful, but there are a few recipes that did work and are very worth mentioning, such as rich coffee ice cream, chocolate and spice, coffee-chocolate (coming soon!), and this one:
Green tea (Matcha) ice cream flavoured with honey and vanilla bean. The flavours work really well together and surprisingly the honey, although I only used a small amount, really came through when the ice cream was completely frozen. In its 'soft-serve' state the honey is less vivid but still enjoyable.
As with most ice creams, start by making a simple custard:
- In a small pan on low to medium heat, heat 250ml whipping cream with half a cup medium-fat milk (2% or semi-skimmed).
- To the cream add the seeds and the pod of half a vanilla bean. The other half of the vanilla pod can be stored in an airtight container for another time.
- In a mixing bowl combine 100g caster sugar or Fairtrade/organic sugar with 3 egg yolks and whisk until the mixture is pale yellow in colour. To this add slightly less than 1 tbsp matcha (fine green tea powder) and stir until any lumps dissolve.
- When the cream mixture is heated through add 2 tbsps of mild honey then remove from the heat and pour through a sieve into the egg mixture quickly stirring with a wooden spoon until well incorporated.
- Return to the pan and heat on a low heat for about 10 minutes, frequently stirring until the custard has thickened. You will need to watch the custard closely. When you can draw a line through the custard on the bottom of the pan with a wooden spoon then the custard will be ready.
Once thickened remove the custard from the heat and be sure to cool it to at least blood temperature before adding it to the ice cream machine. I have noticed that either the honey or the matcha powder seems to stop the ice cream from freezing as fast as it normally does within the machine, so if after 25 minutes the ice cream is still in a 'soft-serve' state, then transfer to a container and complete the freezing in the freezer. With a bit of patience wait until the next day and you will have scrumptious, silky smooth honeyed green tea and vanilla ice cream.
Enjoy!
March 23, 2009
Spring Sowings and Peas...Please
Hi again!
After a long hibernation this winter I've finally awoken to the smell of spring and the many gardening and cooking possibilities that await us in the growing season ahead! My thoughts are on fresh snap peas picked and eaten instantly- save a few for a warm lentil and goat's cheese salad or stir-fry with sesame oil, cashews and rice noodles for an easy dinner. Mmm, the potential for enjoyment is endless...
I hope that everyone had a restful winter because now is certainly the time to begin preparing for the growing season if you haven't started already. For those of you in the UK I'm sure the daffodils are blooming and the weather is 'absolutely balmy' at this point in the season- Enjoy :)
Here it is the first day of proper spring for gardeners across the Okanagan Valley. My neighbour and I were both in the garden this morning planting our first crops of the year. Admittedly I'm playing it safe for now and simply planting cold and frost-hardy peas (Snap peas and regular shelling peas), and Broad beans (also known as Fava beans) which are great sautéed as part of a warm salad. Throwing in some chance (this is like garden financials!) you could plant some lettuce seeds now and they will happily start growing when the soil gets reasonably warm - probably in one month's time- but sometimes the weather surprises you with a really early crop- always a treat!
Last autumn I planted some Kale in mid-August expecting that would allow plenty of time for it to provide a late crop before the winter months set in. Unfortunately the Valley doesn't experience the extended 'Indian Summer' months that I had so enjoyed in the UK, so the Kale's growing season was cut drastically short. However, in the spirit of experimentation, I left the plants in the soil to see if they would survive the winter and continue to grow in the spring.
To my surprise the Kale has started to grow again after the harshest winter seen in years. The snow is still on the mountains and didn't leave the ground until very recently so I am seriously impressed with this Kale and very pleased to be getting an early crop of spring greens. Hurray for positive results! From now on I will plant Kale in the early spring AND early August.
Random Musings:
A little note about winters in Canada:
From what I've experienced this year, being 'new' again to the snowy winter season, winters here are simply enjoyable, quiet, and relaxing. They seem to consist of playing many board games and watching lots of films, trudging through the occasional bit of snow to the local wine bar or café, visiting with friends while bundled up in ski jackets and scarves around huge log fires (going for the maximum warmth factor here), and of course- to offset the pounds of sweets enjoyed over Christmas - lots of skiing and snowshoeing in the great (and very wild) outdoors!
Of course many people here seem to opt out of all of the above and 'fly south' to the U.S states of New Mexico or Arizona where they can enjoy the same activities as in the summer here, but all year round. These people are called 'Snow Birds' by the Americans and a large portion of my family is also a part of this mass migration south. From what I've heard there are literally thousands upon thousands of Canadians in this part of the U.S every winter. I've also been told that a local group has created an entire colony somewhere in Panama...
My view is that, although these trips make for a great renewal, due to the bright, warming sunshine, they can also take away from the forced rest and natural hibernation that a cold and snowy winter provides- something I noticed was greatly missing in the UK- where life was g0-go-go all the time. However, you have to wonder, after experiencing the longest winter ever, not only what I'll say when I'm 60, but also what I'll say next winter.
I wish everyone a productive and enjoyable first couple weeks of Spring season seed sowing!
Elana
Subscribe to:
Posts (Atom)

