July 29, 2009

Garden Reflection


Over the last 5 years I've planted a lot of seeds. The plants in my garden have sometimes grown and sometimes not. In the beginning I didn't have a clue, but over time, after starting with some easy-to-grow greens and tomato plants to build self confidence, my skills have developed to the point where finally I can say "I'm starting to understand".

Lesson Learned:
Not yet a gardening guru, but well on my way, I have learned the hardest and possibly the most important lesson this year: The Soil is Your Best Friend. Take care of it and it will take care of you in ways that you cannot fully comprehend at the start.

Often told this by my Uncle- horticultural expert extraordinaire- and all those excellent gardening books bought along the way, I still didn't quite realise that it's the one factor that will make or break your garden. Last year was my first year with actual garden space- not just pots and grow-bags- and I converted a large grassy area into garden-central. What I didn't do was add lots of dry horse manure and home-made compost into the soil in the autumn. This would have given me an excellent soil to work with this year complete with heaps of minerals and other goodies for my plants to feed on.

As a result, I now have to regularly feed my plants with nitrogen and other goodies in the form of organic fertilizers, as well as adding calcium through diluted milk and epsom salts (the milk's a great tip by the way- especially for melons- feed them with a solution of 1/2 milk and 1/2 water). But a good experience that's come out of this is learning how to make my own fertilizer with things I have on hand such as manure and coffee grounds. Not a very pleasant smell but these homemade fertilizers are rarely pretty. Despite this my boyfriend has given it the classy name of 'CaccaCino'.

Pests:
Some of my crops were absolutely demolished this year by a field mouse or two and 'the quail'- local birds (and also very tasty although I haven't got up the nerve to catch one for dinner yet) who have now figured out how to enter my garden which is surrounded by netting (it worked last year but they've adapted!). I sowed carrots 3 times and a total of 15 out of 150 came up. It was fairly obvious to tell who the culprits were by the peck marks in the soil.

Mulching:
On the up side I've learned the hard way that the Okanagan is a very dry place and plants really need to be mulched. Straw is really expensive here so if you can use that then excellent, but I use dried grass clippings- cheap, easy, and effective. This prevents the soil from drying out on the surface and keeps the moisture in the soil right where the roots need it. It will subsequently save you from having to water every day.

Watering:
Another tip- buy yourself a drip-feed watering system- it's basically like a flexible hose that you can wind through your garden, around the plants, and this will feed the water right onto the soil instead of getting it on the leaves, which can stress the plant in hot weather, and will save you A LOT of work. Just a simple turn of the tap and you can walk away, do something else, and return a half hour later to switch it off. Simple :)

This year's successes so far:
The tomatoes are doing really well. I am so relieved because one year in London all of our 9 tomato plants got Blight because it was such a wet and humid summer, so we had to burn our plants before they'd even produced fruit. Last year I was still getting a feel for cherry tomatoes- we had plenty- so this year is all about trying lots of varieties, big and small, and hopefully I planted enough to get a 'glut' as they say- enough tomatoes to make classic tomato sauce, canned and stored for the winter ahead. Not to mention all the other possibilities- homemade ketchup, canned tomatoes, you name it. Some varieties I've tried this year are Royale de Guineaux, San Marzano (plum tomatoes), White Beauty (the skin supposedly tastes like honey- more on that later), and Gardeners' Delight (a very dependable cherry tomato), along with a few more.

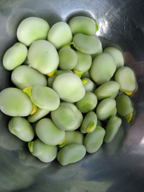
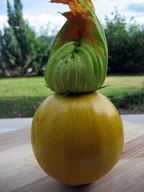
We've had one crop of regular and snap peas (you can eat the shell of these like snow peas or wait for them to develop larger peas) and a second crop is on its way. I tried Broad beans (aka Fava beans) for the first time this year and they were great- a perfect 'meaty' addition to a spring salad of young lettuce leaves, peas, and fresh mint. The purple French beans are coming along excellently with new ones appearing every day. I swear they grow inches overnight! There's a little theme going on at the moment- purple kale (now in abundance as the mice have 'disappeared'), purple beans, and purple peppers. They're really colourful which is the main attraction, but it's also great to grow something that's unique- something fun and interesting that isn't available all year round at your supermarket or produce shop. That's the fun of gardening- growing beautiful fruit and vegetables that taste far superior to store-bought produce. I'd go as far to say that home-grown carrots and melons can even taste like the gods- pure heavenly nectar.

On that note, I'd better let you get on and attend your garden, or plant that first seed you were just thinking about.

Happy Gardening!

April 27, 2009

Herby 'Griddle Cakes'

In all honesty, this recipe came about in my attempt to create a bit of interesting 'stodge' to go with our very spicy bean stew. I didn't want the usual boring potatoes or rice and bread was of course out of the question. So inspiration struck from the Venezuelan classic arepa - a grilled round 'pancake' made of a type of corn flour similar to masa harina, but specially meant for arepas. This mini corn pancake tastes amazing on its own, or classically stuffed with cheese or shredded meats almost like a taco, but many arepas are served with spicy stews to offset the multitude of flavours already competing for your taste-buds and to provide more weight to a vegetarian or meat-minimal dish.

This recipe then is a cross between Southern U.S 'griddle cakes' and South American arepas with a few European herbs thrown into the mix for a deeper flavour.

3 eggs
1 heaped tsp dried oregano leaves
1 heaped tsp dried or fresh rosemary leaves ground or chopped very finely
2 tbsps olive oil

Whisk the above together then prepare the flour mixture:

1/3 cup potato starch
2/3 cup polenta/cornmeal
1/3 cup rice flour
1/4 cup buckwheat flour
1/4 tsp xanthan gum
2 tsp baking powder (gluten free)

*3/4 cups milk (see instructions below)

Mix the flours together then add to the egg mixture and gradually whisk in by starting from the centre, incorporating the flour from around the outside. When the mixture starts to stiffen then add *1/4 cup milk, keep whisking until it starts to stiffen and then add the next 1/4 cup milk, whisk, then follow with the last 1/4 cup.

Heat the frying pan on low-medium heat. Brush some oil onto the pan. To stop the pan from smoking too much simply cook 4 griddle cakes at one time to reduce exposed surface area- this will also give you nice and small cakes. Keep them warm on a plate in the oven on the lowest heat setting until ready to serve. They are best eaten fresh and can be toasted any other time for a quick snack- try it with melted cheese on top.

Enjoy :)

April 19, 2009

Green Tea Ice Cream with Honey and Vanilla Bean

This Christmas saw the introduction of an appliance that's been 'desperately' required in my kitchen for a while- an ice cream machine! After years of attempting to make perfect ice cream with no machine, and certainly with no perfect results, I came to the conclusion that an ice cream machine is completely necessary for the ice-cream obsessed.

Without a machine you are committed to being home once every hour to stir the ice cream to achieve the desired smooth consistency. However, if you don't work from home, then finding a day that allows you to be available this often is quite a rare occurrence.

A Cuisinart ice cream machine is the answer! It's stylish with clean lines and a smooth exterior true to the ice cream it produces. It's simply designed, and that means less moving parts, so there is less chance of breakage and the need for maintenance. This way it should last for a very long time. I've used it every few weeks since Christmas and definitely our consumption of ice cream has increased, but because I only make small batches (lots of small batches = more experimentation!) we then eat less of it at any one time- and it all works out!

Not all experimentations in 2009 have been successful, but there are a few recipes that did work and are very worth mentioning, such as rich coffee ice cream, chocolate and spice, coffee-chocolate (coming soon!), and this one:

Green tea (Matcha) ice cream flavoured with honey and vanilla bean. The flavours work really well together and surprisingly the honey, although I only used a small amount, really came through when the ice cream was completely frozen. In its 'soft-serve' state the honey is less vivid but still enjoyable.

As with most ice creams, start by making a simple custard:

- In a small pan on low to medium heat, heat 250ml whipping cream with half a cup medium-fat milk (2% or semi-skimmed).
- To the cream add the seeds and the pod of half a vanilla bean. The other half of the vanilla pod can be stored in an airtight container for another time.

- In a mixing bowl combine 100g caster sugar or Fairtrade/organic sugar with 3 egg yolks and whisk until the mixture is pale yellow in colour. To this add slightly less than 1 tbsp matcha (fine green tea powder) and stir until any lumps dissolve.

- When the cream mixture is heated through add 2 tbsps of mild honey then remove from the heat and pour through a sieve into the egg mixture quickly stirring with a wooden spoon until well incorporated.
- Return to the pan and heat on a low heat for about 10 minutes, frequently stirring until the custard has thickened. You will need to watch the custard closely. When you can draw a line through the custard on the bottom of the pan with a wooden spoon then the custard will be ready.

Once thickened remove the custard from the heat and be sure to cool it to at least blood temperature before adding it to the ice cream machine. I have noticed that either the honey or the matcha powder seems to stop the ice cream from freezing as fast as it normally does within the machine, so if after 25 minutes the ice cream is still in a 'soft-serve' state, then transfer to a container and complete the freezing in the freezer. With a bit of patience wait until the next day and you will have scrumptious, silky smooth honeyed green tea and vanilla ice cream.

Enjoy!