May 13, 2010
Jicama and Asparagus Spring Salad
I made this salad the other day, and for the first time discovered what makes jicama so very special... its sugar! Combining the sweet jicama with sour lime juice and lightly steamed fresh asparagus and bok choi, the salad made for a great side dish for dinner on a warm spring day.
It's always fun to mix local and unlocal produce at this time of year when you're still waiting for the first peas and broad beans to come up. Because Jicama is definitely imported, I'll only have it once in a while, and for this reason, this was the first time I've managed to use it in the way it's intended- freshly. Previously, my only introduction to the root vegetable had been through seeing it cooked in the traditional Northern style (boiled, steamed), as a substitute for turnip or similar.
If you're going to invite a new vegetable around for dinner it's always best to know it's likes and dislikes, right? In many countries where Jicama is grown you'll find it mainly used in fruit salads and in other dishes with a refreshing, pick-me-up nature - a great use for a starchy root vegetable with high amounts of fructose.
Jicama is a root tuber that is generally grown in tropical climates, although with a good greenhouse and a mild climate I don't see why you couldn't grow it in parts of this country and in Europe too (however it's good to keep in mind that only the root is edible- the rest is actually poisonous!). Jicama looks similar to a yam with it's very white interior and brown, paper-like skin, however it has a unique, crisp texture as it's made up of 90% water- similar to cucumber. It might be worth trying to squeeze out some of this water through a cheesecloth some time...who knows, it might even make a refreshing summer drink.
Jicama and Asparagus Spring Salad
2 green onions (scallions) sliced finely and soaked in cider or white wine vinegar to cover
3/4 of 1 jicama, peeled and cut into roughly 1.5"x1.5" strips, then thinly sliced
handful of fresh asparagus, cut into 2" long pieces
1 'head' of bok choi, washed and leaves and stems separated- stems cut in bite-size pieces
5-6 green/filled olives cut into quarters
pinch salt
juice of 1 lime
small handful of cilantro leaves- a few stems are okay too, roughly chopped
Place the sliced jicama in a mixing bowl with the lime juice. Drain the green onions after they've been soaking for a few minutes in the vinegar and add to the jicama along with the pinch of salt. Stir to coat all the jicama slices in the lime juice. Add the chopped olives.
Boil water in a pan and add the asparagus to cook until just tender. Have some ice and water (mostly water) ready in a bowl. When the asparagus is just cooked remove and plunge into the ice water to preserve it's great colour. Do the same with the bok choi starting with the stems followed by the green leafy tops. Remove from the ice water using a sieve or slotted spoon and add to the salad. Add the roughly chopped cilantro leaves, toss to coat and serve.
May 8, 2010
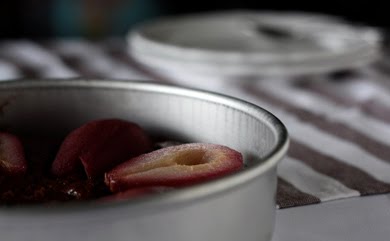
GF Chocolate Clafoutis with Pears poached in Red Wine
As presented at the Choices gluten-free health fair today.
This recipe is adapted from the book Green & Black's Chocolate Recipes - a great source of decadent recipes and an endless source of inspiration. Now gluten-free, you can take this dessert to dinner parties with friends, or keep it simple, even skip the wine, and serve it up to your family after a feast. The individual portions are mostly pear, so it's a deceptively light dessert. Glam it up by serving with a port or fortified wine, or dress it down by using really ripe pears and skipping the wine and poaching stage for an even easier dessert.
Enjoy :)
Serves 6
Use a 9” cake pan, tart or quiche dish
Need: 4 mixing bowls (2 must be heatproof)
3 pears (just ripe), peeled [the pears can be poached in red wine the day before and chilled]
1/2 bottle red wine* (reserve wine after boiling the pears to make mulled wine-see below)
Juice of half a lemon (organic, unwaxed)
2/3 cup cane sugar
1/8 cup +1 tbsp unsalted butter (1/4 cup plus 1 heaped tbsp)
50-60g (half a large bar) good quality** dark chocolate at least 60% cocoa solids (100g)
1/4 cup rice flour (1/2 cup)
2 tbsps tapioca starch (4tbsps)
2 tbsps potato starch (4 tbsps)
1/4 cup (rounded- not levelled off) of ground almonds (1/2 cup)
1/2 cup icing sugar (1 cup)
pinch fine sea salt
1/2 tsp gf baking powder (1 tsp)
2 large eggs, separated (use only one of the egg whites, save the other for an omelette…or pancakes) (3 eggs – beat only 2 egg whites)
1/3 cup full fat milk, but 2% also fine (2/3 cup milk or milk substitute (rice or almond milk)
Fit the peeled pears, stems still on, snugly into a pot with the lemon juice, sugar, and red wine. Bring slowly to a boil, so as not to scorch the bottom, and gently simmer for 20 minutes. Turn off the heat and put the pan to one side, letting the pears cool down in the liquid for another hour.
Melt the chocolate in a heatproof bowl (stainless steel is perfect) in the oven on very low heat (150°F). In a separate heatproof bowl do the same with the butter. When melted, brush some of the butter over the inside of your baking/serving dish and keep the rest to the side.
Preheat the oven to 400°F/200°C
Slice the pears vertically and remove the core and stem- a melon-baller is the perfect tool for coring.
Place all the dry ingredients except for the almonds into a bowl along with the icing sugar and salt. In a separate bowl, whisk the egg yolks with the milk until frothy, then whisk in the melted butter and chocolate. Sift in the dry ingredients and gently fold them in, followed by the ground almonds.
Beat the egg white(s) and add just a little to the chocolate mixture to help loosen it, and then very gently fold in the rest of the egg white- this will be just enough to keep the final clafoutis from becoming too firm.
Contrary to what you’d do in a glutinous clafoutis, place the pear halves in the baking pan first, either with the cut half down in the pan, or alternate the halves facing up and down. Then pour the batter between and around the pears, leaving the pears peaking through. Bake for 16-18 minutes. Keep a watchful eye as this dessert can take only 15 minutes in a convection oven, and 20 minutes in an older oven. This dessert is meant to be luscious and a little gooey- a toothpick inserted in the cake should not come out clean. For a dish awash with chocolate, sprinkle cocoa over the top just before serving.
Notes:
*The red wine adds lots of flavour and complexity, but if you’re in a rush and don’t have any wine on hand, here is an alternative:
Peel 3 ripe (but not overly ripe) pears, leaving stems on. Make a spicy syrup by adding to a saucepan 2/3 cup cane sugar, the juice of 1 lemon, 2 whole cloves, a small (4”) cinnamon stick, 2 cardamom pods-crushed. Add the pears and slowly bring to a boil then reduce to a simmer for 30 minutes. Remove from liquid and allow to cool before slicing and coring as above.
**Recommended brands of chocolate: I recommend buying fair trade chocolate like Cocoa Camino bittersweet, and the non-fair trade but high quality commercial varieties such as Lindt 70% and Valrhona chocolate- harder to find but is guaranteed high quality and high ethics.
Idea: Save the red wine and make into mulled red wine by adding a lemon peel (rind only), a couple cloves and a cinnamon stick- simmer lightly for an hour. It’s quite the treat on a cool, spring day and can always be served along side the Clafoutis as a spicy aperitif.
March 21, 2010
How-to Chocolate cake (gluten-free)
There may still be a chill in the air but spring is definitely here. A hike yesterday through a park near our home yielded ample opportunity for wildlife spotting. Not expecting to see anything, we stumbled upon black birds with striking red-tipped wings foraging with their female mates in a nearby wetland, marmots hanging out near a chicken-coop, and quail shouting their spastic alarm calls as we strolled past their hiding places underneath the forest brush.
As you can expect, after our long walk we were pretty hungry and, following a healthy lunch wink wink, I got to work on a double-layer chocolate cake! I tried a recipe for a decadent-looking gluten-free chocolate cake that I’d been meaning to try for a while. It took a little more prep time than I’d hoped for at the beginning, but the results were excellent. When I told my boyfriend there was no flour in the cake batter he was absolutely astonished, “just almonds” I said, and of course wished the cake batter recipe had been born of my own ingenuity. Apart from my additions of the chocolate ganache topping, and cream cheese, kiwi and Bing cherry filling, and I’ll keep the credit for these thanks very much, the credit goes to Dinah Alison whose book ‘Totally Flour-free Baking’ I bought while still living in London.
Although not all of the recipes are as easy to recreate as the one for chocolate cake, Dinah’s experiments in creating the lightest batters possible have resulted in a very nice cake, with nearly the same ‘crumb’ texture as a flour-based cake. I personally find regular (non gf) cakes too floury; the cake usually more reliant on the raspberry filling, or the thick topping of icing to deliver the wow factor, instead of what should probably be a superb flavour distributed throughout the cake itself. This cake delivers exactly the latter; a great punch of super chocolaty-ness while at the same time not being too rich.
Dinah has discovered a cake’s “lightness of being” so to speak, or as they call it in Chinese ‘Qin Gong’, but don’t quote me on the spelling. It’s a bit like the Kung Fu flying scenes in Crouching Tiger Hidden Dragon…only in a cake… is that a little abstract? Anyway, the secret to achieving lightness, and this will only apply to cake I’m afraid, is using lightweight ingredients such as icing sugar instead of cane or granulated sugar, cocoa instead of melted chocolate (unless you’re going for the dense chocolate brownie effect), and always, always stiffly whisked egg whites.
But there’s more…Dinah Alison goes the extra mile and pre-whisks the egg yolks and then pours this over top of the whisked egg whites, which is then quickly folded all together. What a brilliant idea! And then, after sifting the dry ingredients, not once, but twice, through a large sieve (I used a colander because the mesh of my trusty sieve is too finely woven for the ground almonds to get through it), the dry mixture is dusted over the top of the eggs and folded in with a large spoon, as you would do with any recipe where you want to keep as much air in the batter as possible.
So, now that I’ve let the cat out of the box, I’d better stop talking, and let you source the original recipe for yourself. But if you keep these techniques in mind and play around with quantities of ground almonds, icing sugar and cocoa and the eh hem…6 eggs (separated) that are required…then you might easily come up with an equally brilliant recipe for a double-layered chocolate cake, fit for any occasion.
Also, I must recommend trying the chocolate ganache topping described below. And the cream cheese filling is as easy as a bit of milk blended with cream cheese, or simply use fresh cream cheese if you can find it without adding any milk, mixed with your favourite sweet liquor- Bailey’s is always nice, but don’t use anything too rare or expensive like I made the mistake of using, because you won’t necessarily taste it in between the cake’s already flavourful layers.
In terms of the filling, what matters most is the type of fruit you use and the amount of creaminess in the middle. If you opt for fruit in the middle, then try using fruit that is high in acidity or sweetness such as kiwi, raspberries, dark pitted cherries (fresh or frozen), and mango. For an ‘in-season’ filling I’d recommend using the best local raspberries, preferably from a corner in your own backyard as these should have a much better flavour than often watery store-bought varieties, and try using generous slices of freshly picked, sun-ripened apricots or melon- absolutely the nectar of the gods- all lavishly surrounded by lashings of slightly sweetened whipped cream.
Hmm…well this has me thinking about summer already. I’d better get out and enjoy the first sights and sounds of spring while there’s still a chance.
Chocolate ganache topping:
80 grams (more or less- this doesn’t have to be too accurate) of your favourite dark chocolate*
3/4 cup whipping cream, brought to the boil, and immediately poured over the chocolate. Stir until it makes a smooth chocolate sauce and pour over the top of the assembled cake, being sure to pour around the outer rim of the cake so that drizzles of chocolate run down the outside**.
* You could even try using half an organic, fair trade chocolate bar like Cocoa Camino Espresso chocolate mixed with half of a 70% Lindt dark chocolate bar for example, to easily achieve a rich, mocha flavour. Or you could try using other types of chocolate too, like milk chocolate, chilli-infused, tea-infused, orange chocolate etc…
** If you’d like to get even more decadent, maybe for a special occasion, then double the ganache recipe. Place the cake on a wire rack with a tray beneath to catch the run-off chocolate, and pour the topping all over the top. Cover the sides completely in chocolate with the help of a spatula. The cake will require refrigeration for a few hours until set.
As you can expect, after our long walk we were pretty hungry and, following a healthy lunch wink wink, I got to work on a double-layer chocolate cake! I tried a recipe for a decadent-looking gluten-free chocolate cake that I’d been meaning to try for a while. It took a little more prep time than I’d hoped for at the beginning, but the results were excellent. When I told my boyfriend there was no flour in the cake batter he was absolutely astonished, “just almonds” I said, and of course wished the cake batter recipe had been born of my own ingenuity. Apart from my additions of the chocolate ganache topping, and cream cheese, kiwi and Bing cherry filling, and I’ll keep the credit for these thanks very much, the credit goes to Dinah Alison whose book ‘Totally Flour-free Baking’ I bought while still living in London.
Although not all of the recipes are as easy to recreate as the one for chocolate cake, Dinah’s experiments in creating the lightest batters possible have resulted in a very nice cake, with nearly the same ‘crumb’ texture as a flour-based cake. I personally find regular (non gf) cakes too floury; the cake usually more reliant on the raspberry filling, or the thick topping of icing to deliver the wow factor, instead of what should probably be a superb flavour distributed throughout the cake itself. This cake delivers exactly the latter; a great punch of super chocolaty-ness while at the same time not being too rich.
Dinah has discovered a cake’s “lightness of being” so to speak, or as they call it in Chinese ‘Qin Gong’, but don’t quote me on the spelling. It’s a bit like the Kung Fu flying scenes in Crouching Tiger Hidden Dragon…only in a cake… is that a little abstract? Anyway, the secret to achieving lightness, and this will only apply to cake I’m afraid, is using lightweight ingredients such as icing sugar instead of cane or granulated sugar, cocoa instead of melted chocolate (unless you’re going for the dense chocolate brownie effect), and always, always stiffly whisked egg whites.
But there’s more…Dinah Alison goes the extra mile and pre-whisks the egg yolks and then pours this over top of the whisked egg whites, which is then quickly folded all together. What a brilliant idea! And then, after sifting the dry ingredients, not once, but twice, through a large sieve (I used a colander because the mesh of my trusty sieve is too finely woven for the ground almonds to get through it), the dry mixture is dusted over the top of the eggs and folded in with a large spoon, as you would do with any recipe where you want to keep as much air in the batter as possible.
So, now that I’ve let the cat out of the box, I’d better stop talking, and let you source the original recipe for yourself. But if you keep these techniques in mind and play around with quantities of ground almonds, icing sugar and cocoa and the eh hem…6 eggs (separated) that are required…then you might easily come up with an equally brilliant recipe for a double-layered chocolate cake, fit for any occasion.
Also, I must recommend trying the chocolate ganache topping described below. And the cream cheese filling is as easy as a bit of milk blended with cream cheese, or simply use fresh cream cheese if you can find it without adding any milk, mixed with your favourite sweet liquor- Bailey’s is always nice, but don’t use anything too rare or expensive like I made the mistake of using, because you won’t necessarily taste it in between the cake’s already flavourful layers.
In terms of the filling, what matters most is the type of fruit you use and the amount of creaminess in the middle. If you opt for fruit in the middle, then try using fruit that is high in acidity or sweetness such as kiwi, raspberries, dark pitted cherries (fresh or frozen), and mango. For an ‘in-season’ filling I’d recommend using the best local raspberries, preferably from a corner in your own backyard as these should have a much better flavour than often watery store-bought varieties, and try using generous slices of freshly picked, sun-ripened apricots or melon- absolutely the nectar of the gods- all lavishly surrounded by lashings of slightly sweetened whipped cream.
Hmm…well this has me thinking about summer already. I’d better get out and enjoy the first sights and sounds of spring while there’s still a chance.
Chocolate ganache topping:
80 grams (more or less- this doesn’t have to be too accurate) of your favourite dark chocolate*
3/4 cup whipping cream, brought to the boil, and immediately poured over the chocolate. Stir until it makes a smooth chocolate sauce and pour over the top of the assembled cake, being sure to pour around the outer rim of the cake so that drizzles of chocolate run down the outside**.
* You could even try using half an organic, fair trade chocolate bar like Cocoa Camino Espresso chocolate mixed with half of a 70% Lindt dark chocolate bar for example, to easily achieve a rich, mocha flavour. Or you could try using other types of chocolate too, like milk chocolate, chilli-infused, tea-infused, orange chocolate etc…
** If you’d like to get even more decadent, maybe for a special occasion, then double the ganache recipe. Place the cake on a wire rack with a tray beneath to catch the run-off chocolate, and pour the topping all over the top. Cover the sides completely in chocolate with the help of a spatula. The cake will require refrigeration for a few hours until set.
Subscribe to:
Posts (Atom)